ポテンシャル把握の仕方
同ポテとは
本稿では下記図のように風軸を緑で表しヨットの進行方向を青で統一する.

ヨットは風軸45°のみを進行するのでスタボで走った距離を,ポートで走った距離を
とし,
スタート原点をとしたときの自艇
へのベクトルを考える.
馴染みのある座標系ベクトルで考えると
となる.
風向がスタートラインに対してズレがない(直角)のときがポテンシャルとなる.

またと
軸のなす角
は
であり風軸のズレ (ただし左回りを正)に対してポテンシャル
は
と書き下せる.
すなわち風向変化における他艇に対するポテンシャル損失はと
で定まる.
はスタボとポートの帆走距離比であり,
は帆走した距離なので,
レグ中盤の方が風向変化によるポテンシャルのゲイン・ロスは大きいことが判る.
スタボ・ポートの帆走比をFIXすればただちに直感的理解が得られるはずである.
なおの表を用いればスタボ・ポートの帆走比と帆走時間(≒帆走距離)から,
レース中での艇内情報のみでの定量的なリスクマネジメントも可能である(≒コース期待値計算可能).

一応エクセルに簡単な実装を作った.(Pythonを使える方が読者に多いならより複雑なことも実装します)
作ってみて判ったが上スタ即タックで200mポート帆走(6knot/sと考えて1分弱)後に右振れ10度で22mのポテンシャル得であった.
直感との整合が取れる点が数学の良いところであろう.
docs.google.com
タックによるポテンシャルロスを約1艇身弱(≒4m)とすると,タックを8回も打つ真ん中のコース取りは,
200mポート帆走して左に10度振って26.7m損失した艇と大差がない.
左右の振りが同様に確からしいのであれば期待値は大幅に200mポート帆走の方が上である.
以上の基礎を踏まえた上で要するに他艇が同ポテンシャルなのかどうかを見極める指標を探す.
クローズ
艇の進行方向から風下45°方向の指標で見るのが良い.
アナログコンパスはそういった目的でかつて使われていた歴史もあり,
2画面のデジタルコンパスを適切に艇の中心線に合わせてマストに装着させれば,
自艇のマストにあるコンパスの先に相手艇のマストが合わされば同ポテンシャルである.
同タックの上についてはクルーは手を伸ばすと判りやすい.

ミート艇については見え方が変わらなければ同ポテンシャルである,という見方もある.
ランニング
ランニング角度やトリムする指標ばかりで難しいが,風向に対して直角の指標を探すことが基本になる.
ブームとスピンポールの基本位置は相対風向に垂直であるが,お互いは並行ではない.
ジヴが裏返る程度に落としている場合やのぼり目のときはポールとブームの中間ブーム寄り,
普段はブームの延長線上という風に使うといいかもしれない.

最後に
艇内で整理すべき基本的な情報は主に,
・クローズのミート艇ポテンシャル
・ランニングの反対海面のポテンシャル
・スタボ・ポートの帆走比
・風軸の変化
であろう.
勝てない相手にはさっさと見切りを付け,同ポテンシャル艇に勝つコース取りを意識しよう.
レース前後でマークまでの距離とタイムを確認し,トラックなどアプリを用いて,
レース中に自分がどの海面にいるのかを振り返ることが理解を深める.
回転・鏡像反転用のデータ拡張用コード Train-Valid分けコード
自分用
画像Pathを指定するとデータ拡張してくれるコードと,
画像群フォルダのPathを指定するとValidとTrainの2つに分けてくれるコード.
下記を使うのが一般的かもしれないが........ albumentations.ai
from glob import glob
import random
import os
import shutil

#指定したデータセットPATHの中にTrainフォルダとValidフォルダを作り,VALID_Ratioで指定した量で分ける
def Split_Train_Valid(DatasetFolderPath, filetype = ".png", VALID_RATIO = 0.2):
    """
    Args:
        DatasetFolderPath (string):
        filetype (str, optional): 画像の型. Defaults to ".png".
        VALID_RATIO (float, optional): 検証用のデータ数割合. Defaults to 0.2.
    """
    files = glob(os.path.join(DatasetFolderPath, "*" + filetype))
    random.shuffle(files)
    VALID_DATA_NUM = int(len(files) * VALID_RATIO)

    #make dir
    Train_Dir = os.path.join(DatasetFolderPath, "Train")
    Valid_Dir = os.path.join(DatasetFolderPath, "Valid")
    if os.path.exists(Train_Dir)==False:
        os.mkdir(Train_Dir)
    if os.path.exists(Valid_Dir)==False:
        os.mkdir(Valid_Dir)

    #copy file
    for i, file in enumerate(files):
        if i<=VALID_DATA_NUM:
            shutil.copy2(file, Valid_Dir)
        else:
            shutil.copy2(file, Train_Dir)
#Writer : Yu Yamaoka
#回転と鏡像で8倍水増し用のコード

import cv2

def Augment_ByRotationMirror(ImageFilePath, filetype = ".png"):
        #every 90 degree rotation * mirror = 4 times * 2times = 8times(MAX)
        img = cv2.imread(ImageFilePath)
        width, height, _ = img.shape

        #Mirror
        mirror_img = cv2.flip(img, 1)
        cv2.imwrite(ImageFilePath.replace(filetype,"") + "_mirror" + filetype, mirror_img)

        #If width and height is NOT equal, can't do aug by 90 and 270 rot.
        img_180 = cv2.rotate(img, cv2.ROTATE_180)
        cv2.imwrite(ImageFilePath.replace(filetype,"")+"_180" + filetype, img_180)
        cv2.imwrite(ImageFilePath.replace(filetype,"") + "_180mirror.png", cv2.flip(img_180, 1))

        if(width == height):
                img_90 = cv2.rotate(img, cv2.ROTATE_90_CLOCKWISE)
                cv2.imwrite(ImageFilePath.replace(filetype,"")+"_90" + filetype, img_90)
                cv2.imwrite(ImageFilePath.replace(filetype,"") + "_90mirror" + filetype, cv2.flip(img_90, 1))

                img_270 = cv2.rotate(img, cv2.ROTATE_90_COUNTERCLOCKWISE)
                cv2.imwrite(ImageFilePath.replace(filetype,"")+"_270" + filetype, img_270)
                cv2.imwrite(ImageFilePath.replace(filetype,"") + "_270mirror" + filetype, cv2.flip(img_270, 1))
SSH WARNING: REMOTE HOST IDENTIFICATION HAS CHANGED!
以下をクライアント側で叩いてもう一度SSH打ち直す.
クライアント側
ssh-keygen -R IPアドレス
ホスト側
$ sudo rm data/* -rf
$ rm data/* -rf
サーバ再起動すると今まで使っていたVScodeのSSH Configで入れなかったので,Config内容を消しもう一度SSHし直した. しかし入れなかったので上記を打って解決しました.
下記記事参考にホスト側でプロセスをKILLしまくればつながる.
ps -ef | grep 6c3e3dba23e8fadc360aed75ce363ba185c49794
kill ID
このパターンでも解決
[https://sabakunotabito.hatenablog.com/entry/2022/11/14/021745:embed:cite]
$ cd ~/.vscode-server/bin
$ ls
6261075646f055b99068d3688932416f2346dd3b
$ mv 6261075646f055b99068d3688932416f2346dd3b /tmp
Docker pull→run→exit→psからID取得してexec
自分用です.
Docker Image検索リンクから欲しいImageをPull

$ docker images
からREPOSITORYとTAGの部分を探して下記を埋める. -vの<directory_in_server>マウント場所を指定. pはポート番号で使っていないやつを選ぶ.
$ docker run -it --rm \
--gpus '"device=<GPU_ID>"' \
-p 8000:8000 \
-v <directory_in_server>:/workspace \
REPOSITORY:TAG
(docker)$ exit
で抜けてから,
$ docker ps
で立ち上がっているCONTAINER ID確認,
$ docker exec -it CONTAINER ID /bin/bash
でもう一度は入れる.
学習したモデルの推論結果がnullになる MaskRCNN(Pytorch),onnxruntime
推論を行ったとき結果がnullとなるケースが多々ある. 今回PreTrainedのresnetをonnx exportし,onnx runtimeで推論すると結果が返るが, pytorchで学習を進めたモデルをexportした場合,推論結果がnullとなった際の備忘録.
結論
画像を配列にしたとき正規化を行えば推論結果が返るようになった.
input_image = cv2.imread(file_path)/255
序論
推論時はモデルの入出力の型に注意しなくてはいけない. 今回画像をTensorFloat配列に変換しモデルに入力する.
UWPにonnxモデルを取り込むとcode generatorが自動でラッパーファイルをonnx_model_name.csで生成する.
その際にInputの方をImageFeatureValueまたはTensorFloatにすると思うが,
入力配列の中身の値が0~255で構成されているならばImageFeatureValue,0~1ならTensorFloatを用いれば良い(と思う).
余談だが配列の中身の値が-1~1の範囲を求めるならば,onnxexportの際にtorch.randnを用いる.
modelのexportと推論
学習後のモデルをonnx exportする.
(BatchNorm層のあるモデルでもtorchの最新版であれば対応しています)
import torch
import torchvision
model = torchvision.models.detection.maskrcnn_resnet50_fpn(pretrained=True)
x = torch.rand(1,3,2048, 1084,device=torch.device("cpu"))
torch.onnx.export(model.cpu(), x,
                  "detection_resnet_op11.onnx",
                  export_params=True,#モデルに訓練した重みも保存するか否か
                  verbose=False, #変換の途中経過を見るかどうか
                  opset_version = 11)
上記のように学習済みのResnet50であれば,onnx sessionで推論した画像をcv2で読み込んでInputに指定すれば結果が返る.
今回はtrain_one_epoch(model, optimizer, data_loader, device, epoch, print_freq=100)後のmodelだと推論結果がnullになった.
そこでevaluate(model.cpu(), data_loader_test, device=device)の際にモデルに入力される画像の中身を確認した.
model(images)で推論されているのだが,そのimagesをprint
・Resnet

・自前データセットでの学習後の推論
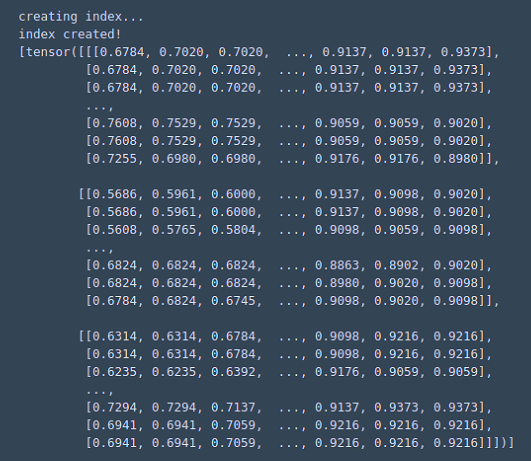
ここで自分の愚に気付く!!
画像を正規化すれば解決しました.
以下推論コード
# Writer : Yu Yamaoka
import onnxruntime
import numpy as np
import torch
import cv2

#モデルの読み込み
onnx_session = onnxruntime.InferenceSession(model_path)# ex:) model_path = "model.onnx"

#入力画像の用意
input_image = cv2.imread(file_name) # file_name = "picture.png"
input_image = input_image/255 #正規化(笑)
input_image = input_image.transpose(2, 1, 0).astype('float32') #モデルのInputの型と合うように転置すればいいです
input_image = input_image.reshape(1,3,2048, 1084)#Ajust model input shape

#モデルへのInputとOutputを規定
input_name = onnx_session.get_inputs()[0].name#NetronでInputの名前を確認してもいい.
output_name = onnx_session.get_outputs()[1].name#欲しい出力を決める,Netronで確認するのが楽.

#推論
result = onnx_session.run([output_name], {input_name: input_image})

#推論結果整形
result = np.array(result).squeeze()
print(result)
本日はここまでです.お疲れ様でした.
Pytorchで学習・保存したonnx(format version6,opset=11)をVisual Studio2019(C#)のUWPで読み込む
備忘録.
Pytorchで学習したモデルをtorch.onnx.exportで保存後,Visual Studioでmodel Outputが返ってくるまでのお話.
環境:
Windows 10 2004 (OSビルド 19041.1052)
onnx opset =11
onnx format version = 6
Visual Studio 2019(UWP)
CUDA : 10.0
cuDNN : 7.4.1
torch 1.8.1 + cu102
torchvision 0.9.1+cu102
onnxの保存
色々とハマる点がある.
・ModelのInput
・opsetの指定
・Model,InputをCPU上で扱うかGPU上で扱うか
今回モデルの入力にはカラー画像を用いたので,縦横(width*heightピクセル)の画像をinputにし,modelはcpu()上に乗せ,opsetは11でexportした.cuda()にすればGPUで使えるようになるが,Inputとmodelは同じハードウェア上で用いなければErrorを吐かれるので注意.
import torch
input = torch.rand(1, 3, width, height)
torch.onnx.export(model.cpu(), input, "model_name.onnx", opset_version = 11)
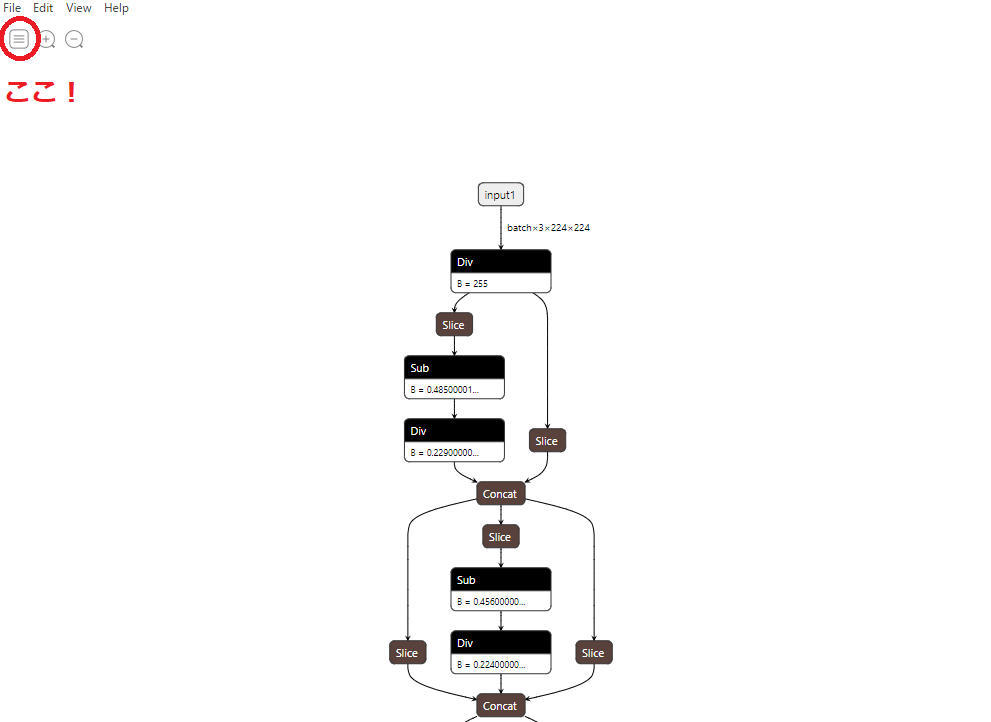
ひとまずこのonnxをNetronで確認してみよう.
 ここまで確認できればonnx出力はお終い.
モデルのラッパーファイル作成
色々と沼るポイントにモデルのインターフェースを合わせる(InputとOutputを合わせる)作業がある.こちらをショートカットさせてくれるのがWindows Machine Learning Code Generatorである.
ツールバーの拡張機能から,インストールして用いるのが手っ取り早い.


自分が半日死んだポイントはVisual StudioのプロジェクトファイルのPath問題である.一応参考リンクを.
さて,ラッパーファイルであるmodel_name.csがVisual Studio上に無事出来上がったら覗こう.
とりあえずInputとOutputを見る.
using System;
using System.Collections.Generic;
using System.Threading.Tasks;
using Windows.Media;
using Windows.Storage;
using Windows.Storage.Streams;
using Windows.AI.MachineLearning;
namespace MNIST_Demo
{

    public sealed class mrcnn_0702Input
    {
        public TensorFloat images; // shape(1,3,width, height)
    }

    public sealed class mrcnn_0702Output
    {
        public TensorFloat output3550; // shape(-1,4)
        public TensorInt64Bit output3213; // shape(-1)
        public TensorFloat output3211; // shape(-1)
        public TensorFloat output3788; // shape(0,1,width, height)
    }
変更ポイントは主に二つ.Inputの型をイメージに,opset=11を読み込めるようにMicrosoft.AI version≧1.8.0を使うこと.
//using Windows.AI.MachineLearning;
using Microsoft.AI.MachineLearning;
public sealed class mrcnn_0702Input
{
    //public TensorFloat images; // shape(1,3,2448,1920)
    public ImageFeatureValue images; // shape(1,3,2448,1920)
}
とまあ公開できる情報は現状ここまで.具体的なコードはオープンにできないが,時間が経ったらできるかもしれない. 引っかかるポイントをクリアさせられていたら嬉しい.
"ModelGenがNull" UWP(C#,Visual Studio2019)でopset≧10,format version≧6のonnxモデルを読み込むときの対処
環境
Windows10 2004 OSビルド19041,1052
onnx opset = 11
onnx format version = 6
Visual Studio 2019
問題
Pytorchで作成したonnxをVisual Studio(C#)で動かすチュートリアルを試していた.
こちらのWindows-Machine-Learning-master\Samples\Tutorial Samples\MLNET and Windows ML
が今回の主人公である.
実行すると,
 NullReferenceExceptionを頂戴したときのおはなし.
調べると読み込んだはずのModelがNullとなっている.
![]()
理由はonnxを作成したときのformat versionとopsetの違いである.
NugetのライブラリやOSのバージョンによっては対応していないopsetとformat versionがある.
こちらのエラーメッセージもvisual studio2019のコンソールに表示される筈.
WinRT Failed to load model with error: Unknown model file format version.
解決策
NugetパッケージでMicrosoft.AI.MachineLearning 1.8.0を入れて,
 MainPagexaml.csとMNIST.cs(モデルのラッパーファイル)の両方で,
using Windows.AI.MachineLearningをコメントアウトし,
using Microsoft.AI.MachineLearning;を入れる.
![]()
Windows.AIとMicrosoft.AIは各種変数の名前が同じなので競合します.
ですのでwindowsの方を消しましょう.
補足
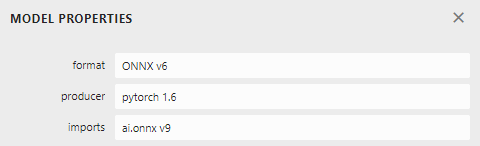
onnxの各バージョンの確認をするにはこちらのNetronを使うのが手っ取り早い github.com
モデルを読み込んだら赤丸でopsetとformat versionをチェックできる

確認欄は下図のかんじ.

MLNET and Windows ML にあるonnxモデルは
UWPの知見と人材が少なすぎて泣けてくる.